Use Shortcuts to convert to WebP
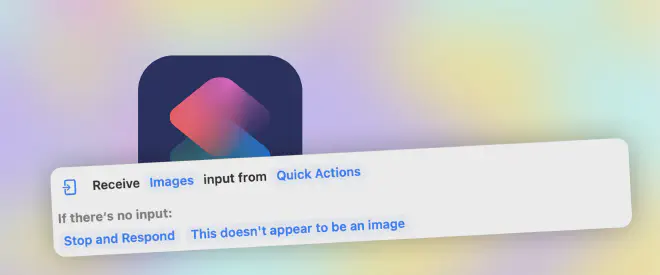
Table of Contents
About this tutorial #
In this tutorial, we will explore the capabilities of an application that ships with macOS Monterey called Shortcuts. We will create an automation that uses the power of Google’s Webp utilities library available on the command line, and makes it accessible in a Finder window with a couple of mouse clicks. There are two parts to this tutorial.
- Install the Webp utilities library from Google
- Create an automation using Shortcuts in macOS
Click here to skip to the finished productal
Introducing Shortcuts #
Shortcuts is an application that shipped with macOS Monterey that allows you to automate repetitive tasks. Shortcuts is a expansion of Automator, which still ships with the OS, and can do everything Automator did in a more intuitive interface. Also the actions can be called from a number of different places like the touchbar on your MacBook Pro, the Quick Actions menu, Keyboard shortcuts and other locations.
Bonus: Shortcuts is also availabe as a iOS and watchOS app and will sync across your iCloud connected devices.
Creating the WebP Shortcut #
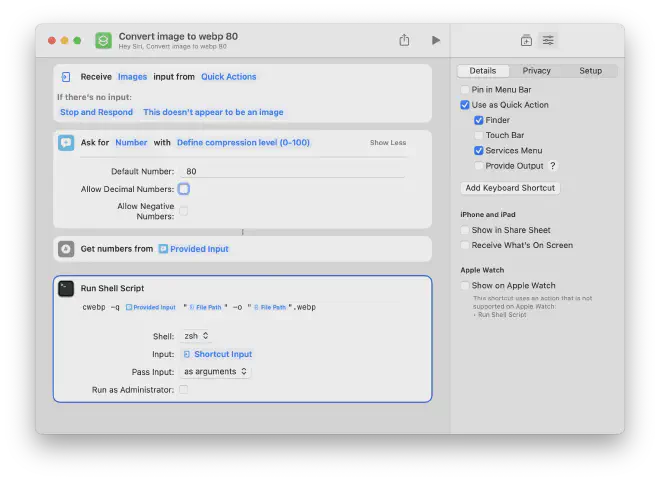
Here’s the completed recipe for converting files to webp. Let’s break it down.
Step 1: Download and install the WebP library #
Before we dive into Shortcuts itself, we’ll need to install the WebP utilities library. If you haven’t downloaded it, grab Googles Webp conversion tool here. It’s available for all platforms, but for the purposes of this tutorial you’ll want the version for macOS, either x86-64 or arm64. https://developers.google.com/speed/webp/download Follow the installation instructions and then come back to Shortcuts.
Step 2: Accessing the Quick Actions Menu #
The Quick Actions menu will add it to the contextual menu so you’ll be able to access this shortcut by right-clicking (two-finger-tapping) on a file in Finder and selecting this shortcut from the Quick Actions menu.
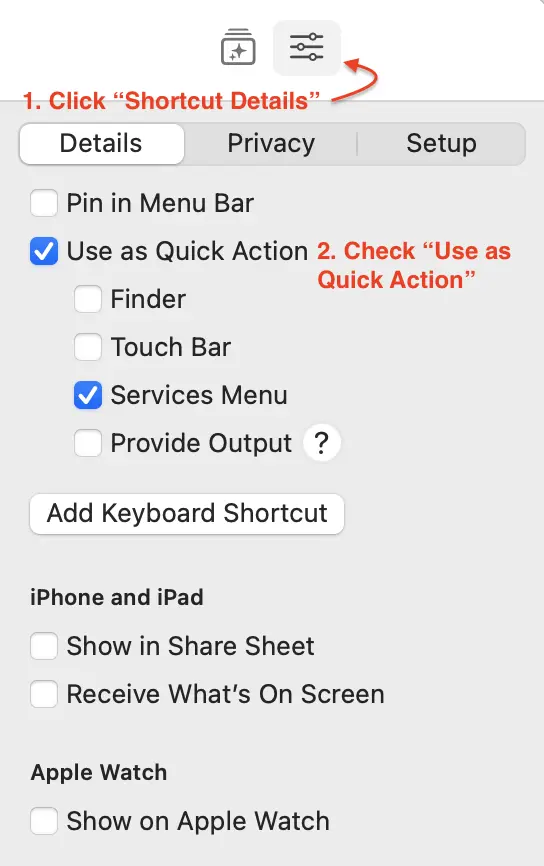
- Click Shortcut Details button from the sidebar.
- Check the “Use as Quick Action” option and the “Services Menu” will checked by default.
You can see here that it’s easy to add this shortcut to other locations or add a keyboard shortcut if desired, but the Services Menu is how we’ll run this shortcut.
Once the settings are in place to use Quick actions, you’ll see this box appear on the left. Select the options to match what you see in the image.

- Click next to the Receive prompt and choose Images
- For “If there’s no input:” click on Continue and choose the “Stop and Respond” option. Add a message like, “This is not a valid image file” (adjust to taste).
The final product should look something like this.

Step 3: Requesting User Input #
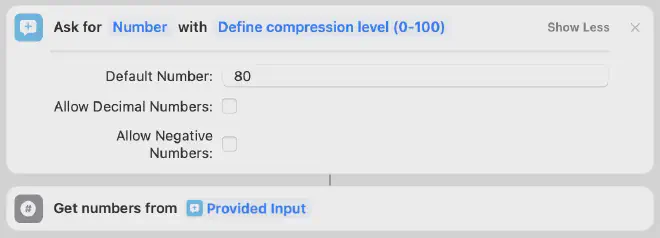
Shortcuts gives us the option ask for input and choosing the amount of image compression is a great use of it. Depending on the image, you may be able to compress the image more without compromising quality. More compression (a lower number) is great for file size, but you don’t want to compress so hard that the image doesn’t look good. That’s where it’s handy to be able to choose the amount of compression that you want to use, and adjust it based on the content of the image. You’ll see below that I’ve chosen a default of 80. That’s a pretty safe option that will provide a good amount of compression without loosing quality. Be sure the boxes are unchecked that allow decimals and negative numbers.
Use the “Get Numbers from Input” block below to grab the number that was entered and make it available to the next block.
Step 4: Understanding the script #
The goal of this shortcut is to run a script that we would normally have to run from the command line. The next step is where all of the action is, but let’s take a quick minute to understand the script before we Shortcutsify it. If you were running this script in the terminal it would look something like this:
cwebp -q 80 random-unsplash.jpg -o random-unsplash.webp
To break it down, we use the cwebp command and set the image quality with the -q 80 flag. 80 means it’s keeping 80% of the quality. You could compress more, and and some point you would be able to visually see the image quality degrade. We provided the option in our shortcut to allow user input to set the compression because every image will compress differently. Experiment with compressing some images harder (a lower number) to observe the visual impact. Notice where it starts to compromise the quality, and then back off a little from there.
The next element in the chain is the file name of the image, and the -o flag points you to the desired output. You can add a filename as we’ve done in the example, or include a more complete file path to place your file in a specific location.
Step 5: Adapting the script for Shortcuts #
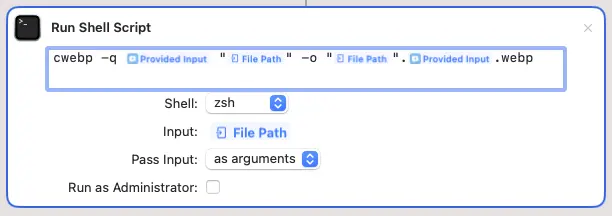
Download the completed Shortcut #
If you just want the completed script you can grab it here: https://www.icloud.com/shortcuts/14d0e982d2f942ef8391ed38726097e4 Remember, you’ll need to have the cwebp application installed in order for this to work
Using your Shortcut #
You can now use your shortcut from any finder window by accessing the contextual menu (right-click/double tap) and selecting your shortcust from the Quick Actions menu. At that point you’ll see an alert box where you can input your compression level and you’ll see the optimized webp in the folder. It will have the same file name with the .webp extension added.
@TODO a few possible improvements #
This solution works great, but there are a couple of things I would love to improve.
- Add the ability to convert multiple files at a time.
- Add the ability to convert an entire folder at a time.
- Instead of the file name including the original file extension like
image_filename.jpg.webpallow it to replace the previous extension. - Give a few more options, like a destination folder.